
Hi, I made this card for a camera and photography enthusiast, so the theme is perfect. I do feel that it would work for other types of recipients and occasions too. To Make The Card
Hi, I made this card for a camera and photography enthusiast, so the theme is perfect. I do feel that it would work for other types of recipients and occasions too.

To Make The Card
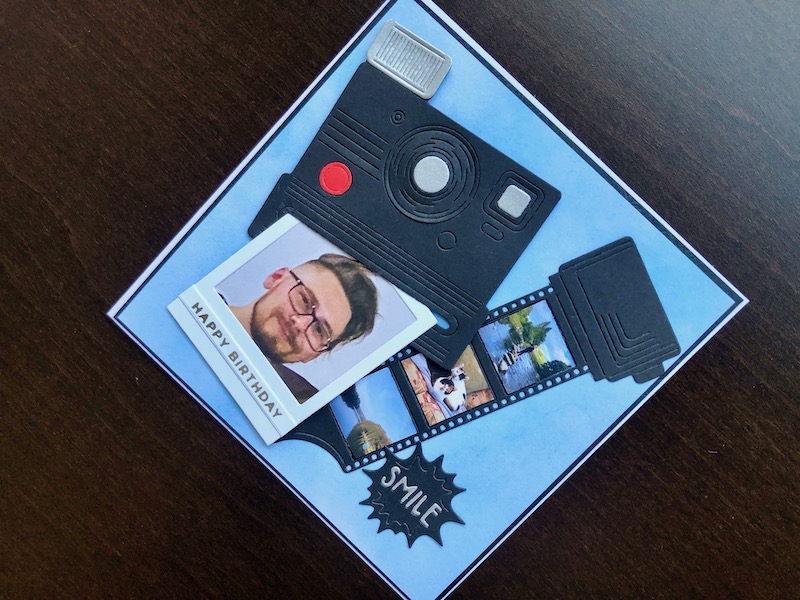
Start with a white 6″ x 6″ blank card and trim it to 14.5cm square. Cut a layer of black card 14.3cm square and a layer of blue textured paper 14cm square. Add the two layers to the blank card. Die cut the camera twice, once from black card and once from matt silver card. From the silver version cut out the flash, the lens centre and the view finder centre and glue these in place on the black version. Cut enough of the camera again from red card to get the shutter button and glue that to the black version as well. Pop out the central strip at the bottom of the camera, where the photo will be printed out from.
Die cut the film strip from black card. Print out 3 photos, 2.3cm square to match the size of the photos in the strip. glue each photo to one of the black squares from the film strip. Glue the film strip to the card front on the right hand side and slightly angled towards the left, then glue the photo squares into the spaces in the film strip. Use thin foam pads to adhere the camera, to the right of and slightly overlapping the film strip. Make sure to leave the open strip clear so that the photo can be inserted.
Die cut the photo from white card, print out a photograph 5.4cm square and glue it behind the photograph aperture. Use silver foil on white card to create the sentiment strip. Use one of the included dies to cut the sentiment strip, adhere it across the bottom of the photo then trim off any surplus on either side. Slide the photo partially into the slot on the camera, at an angle and adhere the bottom edge with thin foam pads as well.
Finally cut the “smile star” twice, once from black and once from matt silver card. Pop the letters out of the black one and insert the silver letters. Add a strip of adhesive tape across the back to hold the letters in place, then adhere it in the bottom right hand area of the card.
In this case I felt the card had enough going on and didn’t need any further embellishments etc. I hope the recipient likes it, and I hope you do too. Thank you for your interest, if you would like to try it for yourself, all the products used are linked below.
Debbie x
Products Used
- White 6″ x 6″ blank card and envelope
- Black, matt silver, red and white card
- Bloom and Wild paper pad (for the blue textured card)
- Extendable paper trimmer
- Snap Happy camera and film die set
- Big Shot die cutting machine
- Mini Everyday Sentiments hot foil stamp and die set
- Silver heat activated foil
- Glimmer hot foil machine
- Craft glue
- 1mm adhesive foam pads