
Hi, I enjoyed using the new Vivid Blooms die set to make a Mother’s Day card recently so decided to use it again for this birthday card. I also used an easy technique to partially
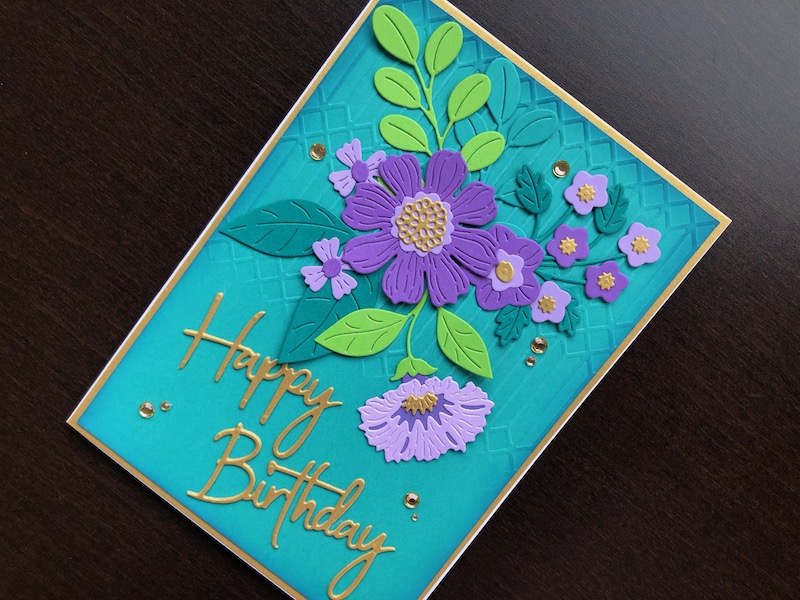
Hi, I enjoyed using the new Vivid Blooms die set to make a Mother’s Day card recently so decided to use it again for this birthday card. I also used an easy technique to partially emboss the background panel so that I had a smooth area to adhere the die cut sentiment.

To Make The Card
Start with a white 5″ x 7″ blank card and trim it to 12.5cm x 17.5cm to make the cutting of layers easier. Cut a piece of matt gold card 12.4cm x 17.4cm and adhere to the card front, so that there is hardly any of the white card blank showing. Cut a piece of turquoise card stock 12cm x 17cm.
Put the turquoise card into the embossing folder so that about one third of it is protruding from the open end. I used a geometric design embossing folder to was careful to make sure it was lined up straight with the design. The most important part of this technique is to make sure you don’t get a harsh line across the card from the edge of the embossing folder. To avoid this, when you create your “sandwich” for your die cutting machine, make sure the top cutting pad is positioned so that the edge is about half a centimetre in from the edge of the embossing folder. Run it through your machine. Ink the edges of the embossed panel with a darker turquoise colour, and adhere it to the card front.
Die cut a selection of flowers and leaves in different sizes and colours of purple, lilac, green, turquoise and matt gold. Assemble all the flowers and arrange them on the top part of the card where the embossed design is. When you are happy with the arrangement, adhere them in place. Use a thin foam pad to adhere the main flower so that the stems of the others can tuck underneath it. Use glue to adhere the rest, but leave some parts of the flowers and leaves unglued to add dimension.
Cut the sentiment words twice each from matt gold card, glue each of them together to make them a bit thicker and stronger and then adhere to the bottom, smooth part of the card. Finish off with some gold, adhesive crystals in the spaces between the flowers, leaves and sentiment. I love the rich colours of this card, and the bold sentiment. I hope you like it too, thank you for your visit, if you would like to make it yourself, all the products used are linked below.
Debbie x
Products Used
- White 5″ x 7″ blank card and envelope
- Assorted colours of card stock
- Extendable paper trimmer
- Columns embossing folder
- Vivid Blooms die set
- Simply Perfect Mix and Match Sentiments die set
- Big Shot die cutting machine
- Distress Oxide ink pad Uncharted Mariner
- Foam ink blending tool
- Gold self adhesive crystals
- Dries clear glue
- 1mm adhesive foam pad