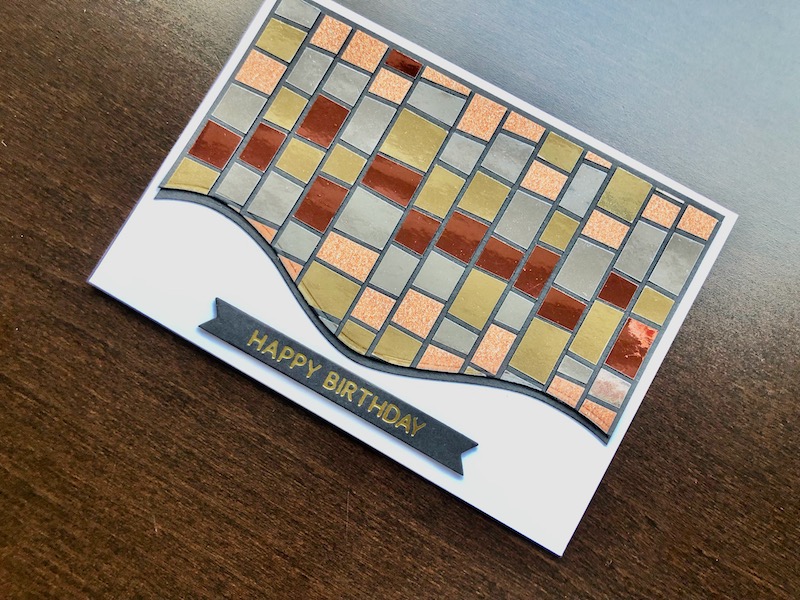
Hi, I needed a birthday card for my son, and was struggling for ideas as I seem to have done all the “masculine” things for him over the years. I saw some mosaic style cards
Hi, I needed a birthday card for my son, and was struggling for ideas as I seem to have done all the “masculine” things for him over the years. I saw some mosaic style cards on Pinterest and realised that it was an extension of the “Scrappy Strips” technique that I used last year for this birthday card. I liked the look of the other cards and thought it would be quite quick and easy to produce. I can’t lie, one or two things went wrong so it took me longer than I expected, however, I am very pleased with the end result, and hopefully you can learn from my mistakes by following the instructions below.

To Make The Card
Start with a white A6 blank card. Cut a piece of black card approximately 15cm x 10cm, this is going to be the backing for the scrappy strips. Cut strips of mirror and glitter card, cut each one at a slight angle, so that it is wider at one end than the other. Make sure the strips are longer than the height of the piece of black card. Glue the strips to the black card, leave a narrow gap between each strip and let them extend beyond the edges of the piece of card. When all the strips have been glued in place, trim off the excess, overhanging strips. At this point you could use it as it is, or continue on to create the mosaic effect by cutting the piece into strips, going across the colours, so that you end up with strips of black card with small pieces of mirror and glitter card attached.
N.B.For the mosaic effect you need to make sure that each mirror or glitter card strip is completely covered with glue. As you can see from the photo when you slice up the strips some of the mosaic pieces are very small and will fall off if they don’t have enough glue on.
So now you have mosaic strips they should be glued onto another piece of black card 14.25cm x 9cm, glue them in straight lines, with a space in between each one, the same size as the space between the pieces of coloured card. Play around with the alignment of the strips, so that the colours are in different positions. When all the strips are glued in place, die cut the longer edge with a curved edging die. I found that even after running it through the machine several times it hadn’t completely cut through all the layers of card, but had done enough for me to finish it off with a craft knife.
Cut another piece of black card 14.25cm x 10cm, use the decorated piece as a guide for positioning the die and cut the long edge with the same curve but making the height about 4mm more than the decorated piece. Glue the decorated piece on top of it with a 2mm border at the top and bottom, then glue the whole thing to the card front. To finish off hot foil the sentiment in gold, on black card and cut into a strip with the matching die. Attach this to the bottom, centre of the card with thin foam pads to raise it to the same level as the mosaic piece.
As I mentioned I am very happy with the end result, the mirror card looks like pieces of glass in the light. Like the one I made before this is a very versatile design as the colours and sentiment could be changed to anything. You could also change the shape of the mosaic panel. I hope my son likes it, and I hope you do too. Thanks for visiting, all the products used are linked below.
Debbie x
Products Used
- White A6 blank card and envelope
- A4 Foundation Card black
- Gold mirror card
- Silver mirror card
- Copper mirror card
- A4 glitter card Blush
- Extendable paper trimmer
- Snowy Scenes Houses die set (for the curved edge die)
- Big Shot die cutting machine
- Hexi Gem Sentiments hot foil stamp and die set
- Glimmer gold heat activated foil
- Glimmer hot foil machine
- Double sided tape dispenser
- Dries clear glue
- 1mm adhesive foam pads

