
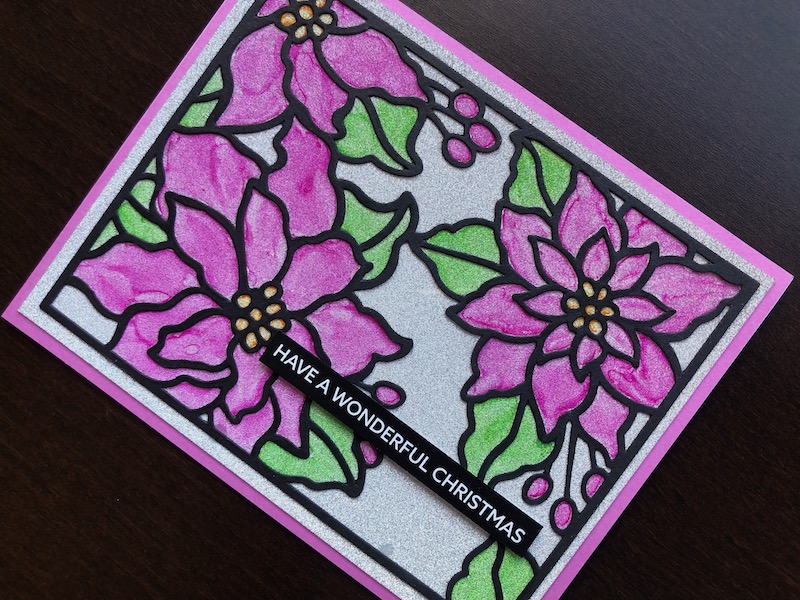
Hi, when I made this card I started by cutting the poinsettia cover plate in black to give me a solid outline, as soon as I had cut it, I realised it looked a lot
Hi, when I made this card I started by cutting the poinsettia cover plate in black to give me a solid outline, as soon as I had cut it, I realised it looked a lot like stained glass so decided to go ahead and make the card that way.

To Make The Card
Start by cutting the Poinsettia Cover Plate from black card. Cut a piece of acetate, 10cm x 12.5cm and glue it behind the die cut poinsettias. Be careful how much glue you put on as any surplus that leaks out will show through the acetate. Colour the poinsettias with alcohol markers, this gives a lovely almost watercolour effect. Leave the background areas un-coloured so that the glitter card becomes the background. Take a 5″ x 7″ white blank card and cut it down to 14cm x 11cm, then add a layer of pink card the same size. Cut a piece of silver glitter card 10.5cm x 13.5cm and adhere over the pink card and finally add the stained glass layer.
Trim the sentiment from the sentiment sheet. Go around the edges with a black marker pen to cover up the white. Adhere the sentiment to the bottom right hand area of the card with thin foam mounting pads.
I am very pleased with the way this card has turned out, particularly the way the glitter card shows through the coloured areas as well as the clear ones. Thank you for visiting, I hope you like it too. If you want to try it for yourself, all the products used are linked below.
Debbie x
Products Used
- White 5″ x 7″ blank card and envelope
- A4 Black Foundation card
- Silver No Shed glitter card
- Pink card
- Extendable paper trimmer
- Poinsettia Cover Plate die
- Big Shot die cutting machine
- Heat Resistant Acetate
- Dries clear glue
- Assorted colours Alcohol ink marker pens
- Wordies Traditional Christmas sentiment sheets
- Double sided tape dispenser
- 1mm adhesive foam pads