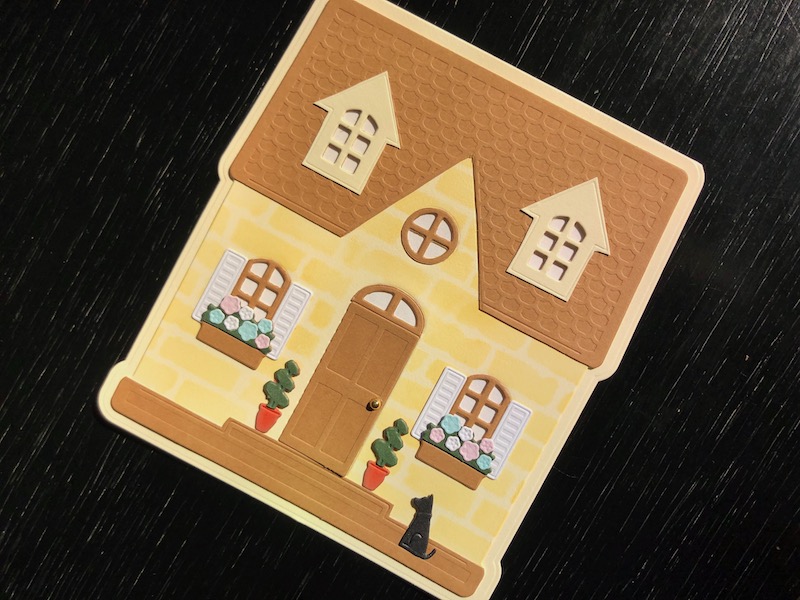
Hi, I don’t usually make shaped cards but thought I would give the Cottage Shaped Die Set a go for this new home card. The set has three dies, one cuts the cottage shaped card
Hi, I don’t usually make shaped cards but thought I would give the Cottage Shaped Die Set a go for this new home card. The set has three dies, one cuts the cottage shaped card base, and the others cut the cottage outline and detailing. This means you can choose whether to use the shaped card base or just cut the cottage and mount it on a standard square or rectangular card. I also used the co-ordinating House Front Accessories Die Set to add things like the window boxes etc. I decided to put the sentiment inside the card so as not to detract from the detail of the cottage.

To Make The Card
Start by making the card base, take a piece of cream card approx. 13cm x 28cm and fold it in half to make a tent fold card. Use the outer die from the set to cut this into the cottage shape. Line up the top of the die, where there is no cutting edge with the fold in the card and run through the machine. Now cut the cottage shape and detail twice, once from cream card and once from brown. A piece of Sticky Grid in your cutting plate will keep the two dies in position.
Use a craft knife and ruler to cut out the two dormer windows from the cream cottage, then use a stencil and Distress ink to add a brick pattern to the cream cottage front. From the brown cottage, hand cut the roof, window frames, door and steps. Adhere these in position on the cream cottage, then adhere the cream dormers over the brown roof.
Now it’s time to have some fun adding decorations to your cottage. Die cut four shutters from white card and glue them either side of the downstairs windows. Cut the window box twice once from brown card and once from green, cut the green one in half across the top of the box and glue the greenery on to the brown one. Die cut tiny flowers from different colours and glue in position on top of the greenery.
Die cut two topiary pots, once from orange card and once from green. Cut the tree part of the green one away from the pot and glue in place over the orange one. Ink the edges of the orange pot slightly with brown ink, to soften their appearance. Glue the finished topiary pots either side of the front door. Glue plain white paper behind all the windows, and add a small gold adhesive gem as a door handle. Die cut a dog from black card and glue in front of the house.
The whole cottage can now be adhered to the cottage shaped base, and the sentiment stamped on the inside.

The two die sets combined, give you lots of choice for colour combinations and decorations, so you can create different looking houses each time. I am very happy with the results, I specially like the little dog 🙂 Thank you for visiting, all the products used are linked below.
Debbie x
Products Used
- Cream, brown green, orange, pink, blue card
- A4 Coconut White card
- A4 black card
- Cottage Shape Card die set
- House Front Accessories die set
- Big Shot die cutting machine
- Tim Holtz Brick stencil
- Scattered Straw distress ink pad
- Foam ink blending tool
- Craft knife
- Ruler
- Double sided tape dispenser
- Dries clear glue
- Gold self adhesive metal gem
- Bless This House clear stamp set (for the sentiment)
- Memento Tuxedo Black ink pad

