Hi, I have been itching to try out this new Quilted Embossing Folder by Tim Holtz ever since it arrived. As I am making Fathers Day and mens birthday cards right now it seemed the
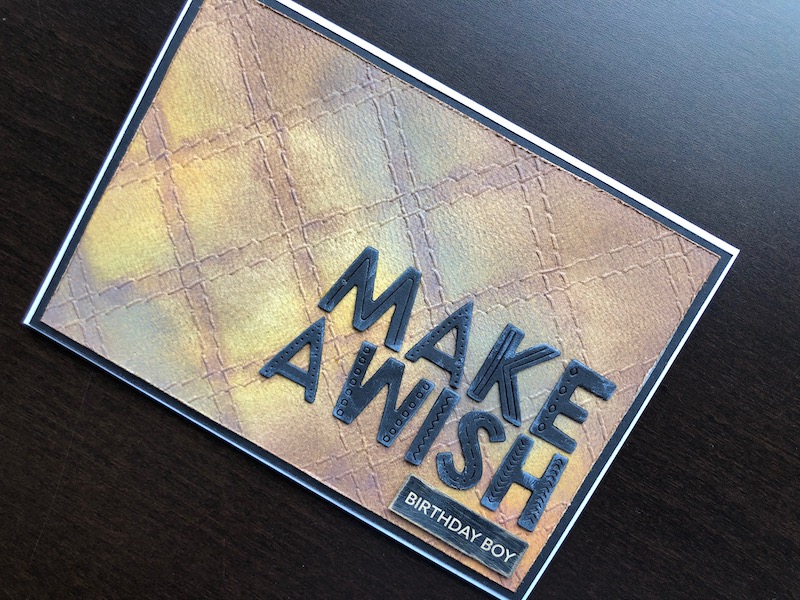
Hi, I have been itching to try out this new Quilted Embossing Folder by Tim Holtz ever since it arrived. As I am making Fathers Day and mens birthday cards right now it seemed the ideal time to use it. I have to say it is every bit as good as I hoped, the level of detail is amazing. I wanted the embossed panel to be the focal point of this card so kept everything else very simple.

To Make The Card
Start with a piece of watercolour card stock about the same size as the embossing folder. Blend Distress Oxide ink in Spiced Marmalade, Vintage Photo and Frayed Burlap all over the card, then lightly ink over the whole thing with Hickory Smoke. Spritz the back of the inked card lightly with water and emboss with the Quilted embossing folder.
Take the foam pad off an ink blending tool and fold it in half to create a small point. Load a small amount of Vintage Photo in onto it and gently drag it along the stitch lines to darken their colour. Use a foam ink blending tool to apply a thin coat of Distress Micro Glaze all over the surface. This seals the ink and adds a slight sheen to make the leather look even more realistic. Trim the panel down to 9.75cm x 14cm, then use a paper scruffer to roughen the edges. Ink around the edges with Vintage Photo to cover any white card that has been revealed.
Cut a piece of black card, 10.25cm x 14.5cm, again rough the edges. Adhere the embossed panel to the black card and adhere them both to the front of an A6 white blank card. Cut each of the large letter twice from black card and glue them together to give extra dimension. Roughly ink the edges of the letters with white pigment ink to create a worn effect. Cut the Birthday Boy wording from the sheet of sentiments, roughen the edges with a paper scruffer, and lightly sand the surface with a fine sanding block. Swipe Frayed Burlap ink across the surface and around the edges. Adhere the small sentiment in the bottom right hand corner of the card, using thin foam pads. Adhere the Make A Wish lettering above the Birthday Boy sentiment.
I hope you like the card, I love the way the leather look turned out and think it’s a great choice for a male birthday card. Thank you for visiting, all the products used are linked below.
Debbie x
Products Used
- White A6 blank card and envelope
- A4 Black card stock
- Watercolour card stock
- Distress Oxide ink pads Vintage Photo, Frayed Burlap, Spiced Marmalade, Hickory Smoke
- Foam ink blending tool
- Quilted 3D embossing folder
- Big Shot die cutting machine
- Paper Scruffer tool
- Distress Micro Glaze
- Marked Alphabet die set
- White pigment ink pad
- Wordies Birthday sentiment strip sheets
- Sanding block
- 1mm adhesive foam pads
- Cosmic Shimmer dries clear glue
- Double sided tape runner

